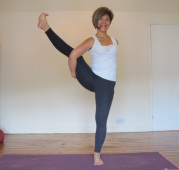
Bird of paradise (SVARGA DVIJASANA)

The Bird of Paradise is one of my favourite asanas. It's challenging and is not for a total beginner (unless you're a dancer, I guess). To practice this pose, be sure you're properly warmed up. Do a few rounds of Sun Salutations and plenty of shoulders and hip opening poses as well as twists. Try these poses to get your body ready: Puppy Pose, Malasana (try the twisting version too), Seated Twist, Seated Pigeon, Upavista Konasana, and Side Plank / Wild Thing (for core strength and shoulder opening).
STEP-BY STEP
1. From Mountain Pose (Tadasana) with feet at hip width distance, exhale and fold forward from the hip creases with a long spine (pelvic floor and lower belly drawn in and up to protect your spine).
2. Bend the knees and let both arms dangle for a moment. Inhale, roll your left shoulder onto your back and you take the left hand to bind behind you, resting the back of the hand at the top of your right hip. Exhale, walk the right hand to the left and stretch the right side of the torso. Hold for a few deep breaths.
3. Bring the right arm to the inside of the right leg. Exhale and bend the knees a little more as you slide your right elbow underneath your right knee, taking the hand under the thigh and up to meet the left hand to create a bind (as in the photo).
3. If your right hand cannot find the left hand (on your right hip), hold a belt in your left hand and follow step 2 but take the right hand to the belt instead of to the left hand. Don't move your left hand lower down the right hip and don't tuck too much of your right arm under the right leg. Do try to keep the right arm lower down towards the right knee, and not up towards the top of the thigh. You don't want the bind to restrict you from coming up to stand tall.
4. Once you've got the bind, use your exhale to lengthen the spine and twist open to the left while keeping the arms as they are, both knees bent or just the right knee (you can work towards straightening the right leg when you are ready). Spin the chest more towards the left with the bottom tips of the shoulder blades moving in towards the spine. You can look up or down. Stay here if this is enough for you.
5. To come up to standing, turn your chest and head back to the front and transfer your weight into your left foot. Come on to the toes of the right foot.
6. Find your breath and core (breathing into the chest and upper back, breathing out from the pelvic floor and the lower belly, and connect deeply to the left foot and inner thigh). Grounding down through your left foot, use your out-breath and lift the right leg up, using your deep core muscles, not the arms. You can stay here and breathe, pressing the right thigh and the right arm against each other.
7. When you're ready, engage the core (breathe out and lift up the pelvic floor and lower belly) and press down into the left foot to bring yourself up. Open the right knee to the right more and tuck the right sitbone under. Press the front of the left thigh back to straighten the leg. Roll both shoulders onto your back and breathe!
8. For the full pose, from step 7, lean your torso forward and spin your right thigh inward towards the right shoulder. This will send the right sitbone wide to the back and allow you to straighten your right leg a bit more. Keep working here to get the leg straight. Once it's straight, draw the belly in and begin to come back up to standing. Notice that, as you start to come upright, the right thigh will begin to rotate outward a bit! Once you're up, roll the shoulders onto your back and turn to look over your left shoulder. Hold for as long as you want.
9. To come out of the pose, turn back to centre, begin to round forward, and bend the right knee. Bend the left knee and slowly, and, with control, lower the right foot back to the floor. Release the bind and try the other side!
Enjoy. For modifications, variations and lots more tips on how to work up to this pose, come to class on Thursday this month (July 2013).
