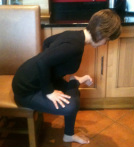
Seated Pigeon pose

The seated pigeon is a wonderful pose for those with tight hips. It can be done anywhere including at your office desk. If you have problems with your knees and can't bring your ankle all the way onto the opposite thigh, you can modify this further by straightening the lower leg and rest the other ankle (outer ankle) anywhere, as low down as you wish, on the straight leg. When you go into the forward bend and allow the head to hang like a ripe fruit, you will also get a bit of a back stretch too.
STEP-BY-STEP
1. Sit on a chair, a little forward so you're not leaning into the back of the chair, with your ankles directly below your knees. Move the flesh off your sitbones and ground them into the seat.
2. Bring your right knee up to the chest and give it a good hug. With the knee in complete flexion (bent deeply), flex the right foot and begin to drop the knee open by rotating the thigh outward from the hip joint. Rest your right ankle on your left thigh, just above the left knee. Keep pressing out through the balls of the right foot to protect the knee.
3. Now, if that is horrible and painful or not available for you today, stretch the left leg straight with the heel on the floor, and rest the right ankle lower down on the left leg, anywhere where you can do so without pain.
4. If you can feel a deep stretch sitting up tall, then please stay here. If not, hold onto the seat of the chair and breathe in to lengthen the spine. Breathe out, draw the pelvic floor and the lower belly in and up. Fold forward from the hip creases, keeping the spine long to begin with. Only go as far as is comfortable, then allow the spine to gently round to get an extra back stretch.
5. If, however, you have any spinal disc issues, please keep the spine long and do not round.
6. Stay and breathe. Send the breath down to the belly and the right outer hip, and breathe out release and soften as much as you can. Do stay for at least 7-10 breaths. Sometimes we think we are releasing but these muscles are stubborn and they can tighten up instead. It's better to not go so deeply into the forward fold but to hold a little longer!
7. Do the other side. Feel free to hold longer on the tighter side. Remember that the aim is for balance, so the idea of holding them for the same number of breaths doesn't always work.
You might want to try adding a twist to it by, exhaling and bringing the right forearm, or upper arm if you can get that deep, to the sole of the right foot, and the left arm can bind behind your back. Inhale to lengthen from the tail to the crown and exhale to maybe twist a little deeper while keeping the spine long. And, again, feel free to do the other side.
Enjoy.
