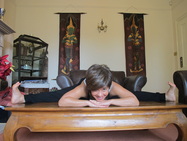
UPAVISTA KONASANA - WIDE ANGLE seated FORWARD BEND

Upavista Konasana, or wide angle seated forward bend - mouthful of a name in Sanskrit and English, and possibly one of the most hated poses. In fact, never mind folding forward, for many, just sitting upright without rounding out the lower back seems impossible. A lot of people have a posterior tilt of the pelvis when sitting down. This means their ASIS, the hip bones that you can feel at the front of the hips, move back as the sit bones move forward, causing the spine to round and bringing the pubic bone and the chest closer together. To be told to "lift your chest up off your hip" isn't going to make it happen.
The fix for the posterior tilt is to place blankets or yoga blocks or cushions just under your sitbones (the thighs do not rest on the padding). The padding must be high enough to bring your pelvis upright so that your spine can be long, and the crown of the head, the heart centre and the pelvic floor are aligned.
STEP-BY-STEP
1. Respect your body. I don't know how many people have hurt themselves because they push too hard and too fast in this pose or have been "adjusted" by teachers beyond their capabilities. This is a pose that, when done without mindfulness and respect for the body, you risk tearing connective tissues connecting hamstrings to sit bones or straining the groin area. Trust me that these two injuries will cause pain for a long time!
2. Come to sit, with your legs comfortably wide (remember the groin injury from point 1) on the floor, or on padding (cushions, bricks or blankets) with your pelvis upright and the spine long.
3. Keep the knees slightly bent if you feel the stretch behind the knees or at the top of the hamstrings near the sit bones. You want to stretch the belly of the muscles, not the ends. Flex the feet and visualise pressing the soles against an imaginary wall that is also pressing back into your feet. This will activate the quadriceps and your deep core line.
4. Bring your hands to the floor inside your legs. Breathe out, lift the pelvic floor and the lower belly, and walk your hands forward as you bend from the hip creases, keeping the spine long.
5. When you feel the stretch, stop and either wave side to side or stay still and breathe, allowing the muscles time to relax and lengthen. Make sure that knees are pointing up and not rolling back or forward. Keep the pelvic floor, the lower belly, the feet and the inner thighs engaged.
6. Practice, practice, practice and all is coming. Maybe! If your muscles are tight, practice and the breath will help take you deeper over time. If your bones are made in such a way that there is no room for more movement (you'll feel this more in the hip joints than in the hamstrings), then practice acceptance.
7. Enjoy the peace that this pose can bring when you are working at your own level.
