BRIDGE POSE (VARIATION)

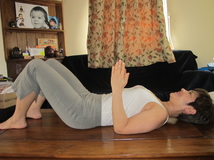
I am often asked what to do for tight neck and shoulders, or rounded shoulders, and/or weak core. This version of the Bridge pose is so good for all three! In fact, just doing the first part, the zero balance position in the adjacent picture, with deep breathing is enough to help tone and stretch the muscles in the neck, open the chest and correct rounded shoulders, as well as strengthen the core. Here's how to get into Zero Balance and then into the bridge pose as in the main picture.
STEP-BY-STEP
1. Come to lie on your back with the knees bent and feet on the floor (coffee table!). Walk the feet as close to the buttocks as you can and notice how your tailbone will tuck under and pubic bone will lift up. Now walk them far away from the buttock and notice how the tailbone will curl downward toward the floor and the arch in the lower back becomes deeper. Walk your feet back in to find neutral spine, some place between the two extremes, not too close to the buttocks and not too far away. There should be a little arch in the lower back but not too deep. If you place your thumb on each hip bone (the boney bits at the front of the hips) and your fingers on the pubic bone, they should be level.
2. Try not to tuck the chin in. Imagine the ceiling as a mirror. Keep your eyeballs in the centre of the sockets, and check if, when you look up, you are looking straight into the "reflection" of your eyes on the ceiling. If you are looking toward the back of the room, your chin is raised too high. If you are looking to the front, you've tucked your chin in too close to the chest. Again, the mid point is what we want. You are now in ZERO BALANCE position.
3. Bring your elbows in close to your ribs with the hands pointing up to the ceiling. Breathe deeply in and out, press the back of your arms, the outer tips of the shoulders, the feet (especially the inside) and the back of the head into the floor. Make sure not to tuck the chin in or the tailbone under. Keep drawing the bottom tips of the shoulder blades in closer to the spine.
4. Stay for 3-5 breaths and relax for a few breaths. Repeat a few times.
5. To move into the bridge (main picture), move your feet closer to the buttocks so that your ankles are aligned with your knees. Lift up the pelvic floor and the lower belly. Inhale into the chest, curl the tailbone up, press down into the feet and the elbows, and raise your bottom and back off the floor. Keep the outer tips of the shoulders and the back of the head pressing down into the floor. Exhale and slowly release back down from the top, one vertebra at a time with the tailbone the last to touch the floor, to the starting position. Repeat a few times. Keep making sure that the chin does not drop toward the chest.
5. After moving up and down a few times, you might want to stay up for a few breaths. Remember to keep the pelvic floor and the lower belly lifted in and up. Breathe into the chest and breathe out drawing the belly in more. Keep the back of the head, the feet and the outer tips of the shoulders pressing into the floor. Continue to draw the bottom tips of the shoulder blades toward the spine. Remember to hug the legs in toward the midline (toward each other) too so that the knees don't drop open.
6. To come out, curl the tailbone under and slowly release from the top down with your out-breath.
7. Once down, keep the feet on the floor, knees bent, but take the feet wide apart and drop the knees in toward each other. The hands can just be by your side or you can wrap them across the chest. Breathe into the back body and relax.
These two poses also help to realign the body, correcting the head-forward posture we tend to adopt when sitting all day in front of the computer! Bear in mind though that stress causes more pain than a little bit of stooping! If you're under a lot of stress, take some time to release it by going jogging, dancing, doing fist of fire lunge or Kick-asana with Ha breath (come back here another day for Kick-asana step-by-step instructions) or whatever you like that helps you to burn off some negative energy. Then, lie down and chill out with long, slow, deep breathing. Be well!
